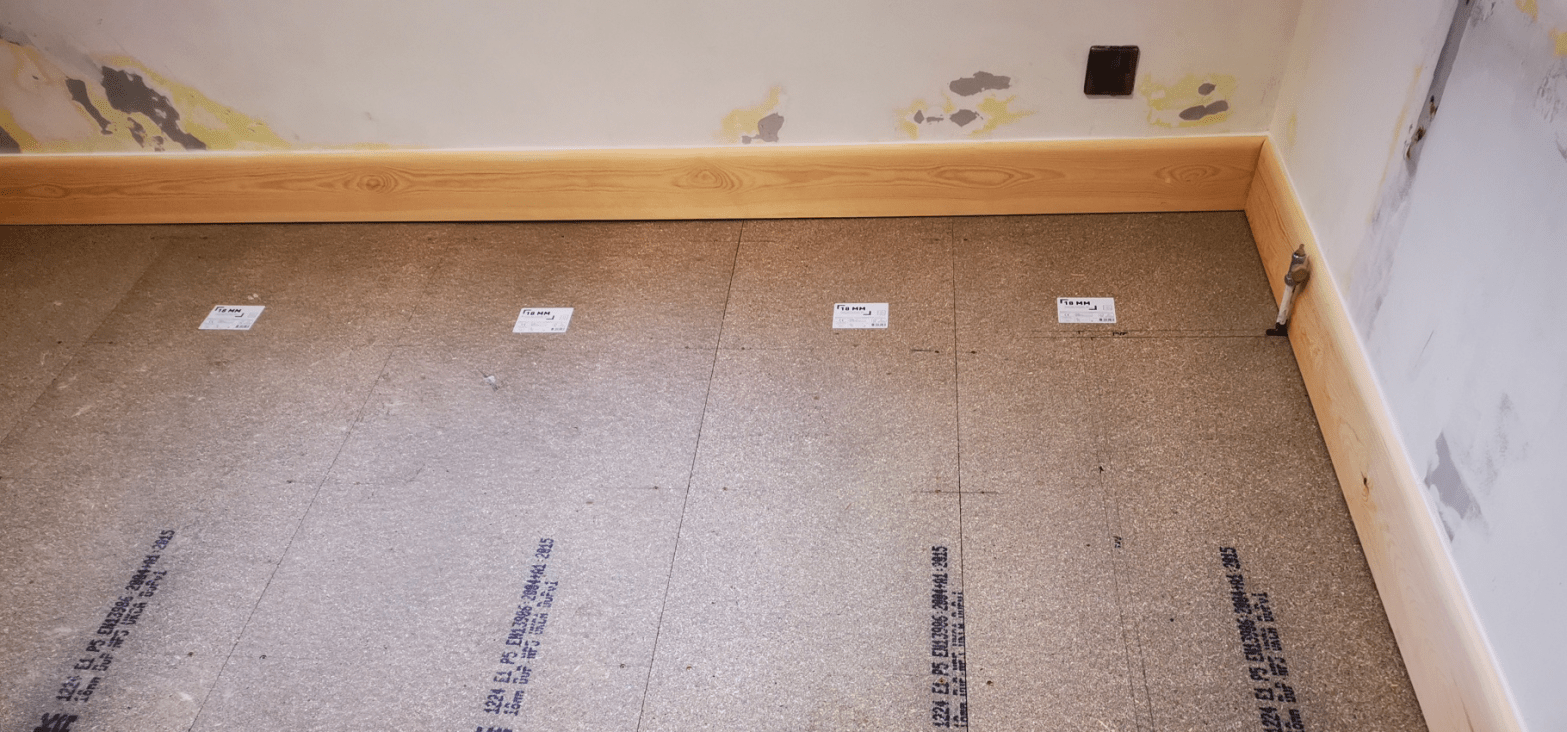
This crown cap handrail was left unpainted so that the grain and beauty of the wood can be seen, with this in mind I took my time selecting the wood for a clean straight grain without any knots.
The sweep from the bottom of the stairs to the top is unbroken therefore there are no breaks in the handrail on the corner or where the pitch changes. This is important for less mobile people who need the reassurance of something to get hold of for support whilst going down or up the stairs.
The wall that the handrail is fitted to is a stud wall, made up of plasterboard tacked to a timber frame so in effect a hollow wall. I used a specialist fixing to fix the brackets one which ‘balloons’ out behind the plasterboard and into the cavity. All in all a neat and tidy job.
Crown Cap is not used so much these days I have only one supplier who stocks it, and only in soft wood. I do have cutters to machine crown cap myself although such a small run would not warrant the time it would take. I think crown cap is easier to use as a handrail particularly if ones grip is not what it used to be. Also it can be screwed directly to the wall rather that hung on brackets, that’s useful if you are restricted on space.
Carpenter’s Tools of the trade
I know of no other trade except perhaps a good all-round mechanic who requires so many tools in order to undertake their work. A brief look at online suppliers or trade catalogues will reinforce this statement.
However, there are tools and then there are quality tools that to those in the trade hold a certain beauty. You can feel the quality and using good well-made hand and power tools is reflected in the overall quality of a finished project or article being made.
Of course, for those who have no desire or need to undertake such tasks and who may only use a power drill for instance maybe twice a year, there is no need to invest in high end expensive tools and equipment. But for those of us who day in day out rely on precision and performance there can be no compromise.
I still use some of the hand tools that as an apprentice was instructed to buy namely a few chisels and planes along with hand braces and hand saws. My chisels some of which have now been discarded as the iron has been ground and sharpened so many times as to render the chisel to short are one of those essential hand tools that I was told to get.
The company where I served my time used to deduct £1 a week from my wages for tools, given that my take home pay was the princely sum of £12 the £1 deduction was noticed. Once or perhaps twice a year the foreman would then hand over a selection of tools that the company had purchased for the apprentices. It was a system that worked well, and I guess the buying power of the company ensured a generous discount therefore we built up over the course of an apprenticeship, in my case 5years, a well-stocked tool chest.
The tool chest was made during the first year of an apprenticeship from Mahogany would you believe! And all the joints were dovetailed including the insert trays. This became your pride and joy in the work place and the tools that filled it your passport to earning a living. This was back in 1978 so portable power tools which were just showing up in the boat yard were for the men not the boys.
I still have my tool chest.
The insistence on quality and well looked after tools could also be seen when on Friday afternoon an hour or so before clocking off nearly all the joiners and boatbuilders turned to their tools and sharpened them ready for the following week along with any minor maintenance issues perhaps adjustments to plane irons or the sorting of drill bits etc. The company didn’t seem to mind this down time perhaps it had been negotiated I don’t know but I wonder if it’s a practice that is still going on in industry. It’s a habit which not necessarily practiced on a Friday I still undertake as a specific task.
I have seen a revolution in portable power tools since my first power drill in the 1980s, routers especially can now undertake tasks that were not possible back then and skill saws that run on tracks make light work of sheet materials that need to be cut.
The tools of my trade and the tools that I own are an intrinsic part of being a carpenter. The saying that a bad tradesman always blames his tools may be true, but a good tradesman only uses good quality tools.
As you can see the chisels shown at the beginning of this article are well worn, these are my everyday chisels that I carry around from job to job and form a small part of my overall mobile tool kit.
The second from the right was deliberately bent as I needed to get into an awkward corner whilst fitting spindles and handrail. There are generally three types of chisel available from most tool outlets that I use.
The Bevelled edge chisel which is bevelled along both edges, this is used for general light joinery the advantage of having the bevels is that it can be used to undercut housings in mortices and dovetail work.
The Firmer which is becoming increasingly harder to find has a stout blade without the bevels on each side and can be struck smartly with a mallet, I use this for more demanding carpentry.
The Paring chisel which is becoming even harder to find has a longer blade usually around 7-9” depending on the width of the blade but older ones were up to 12” in length these are used to trim long grooves or as the name indicates to par wood. This is the chisel I use most of all and because of its extra length you have more control over it.
Other types include:
The Mortice chisel which as the name suggests is generally used for cutting mortices.
Firmer Gouge used to cut hollow or curved shoulders.
Swan Neck used to cut deep blind recesses.
All Steel chisels, these are made from one piece of steel with no wooden handle and be struck hard with a hammer so are ideal for heavy site carpentry.
I am always on the lookout for old chisels with reasonable stock, old would be pre 1970. The steel used then to manufacture them is superior to the steel used nowadays, so they keep their edge longer. If you have any old chisel lying around in an old tool box in the garage – then I’m your man, give me a ring or use the contact page and I will be interested in buying them.
When it comes to sharpening, I try to maintain a bevel of 25 degrees, many carpenters then go on to hone the cutting edge to 30 degrees, but I was taught to stop at 25. There are plenty of videos on youtube and other platforms that show you how to grind and sharpen chisels and I am sure the world really doesn’t need another one, so look there for advice on sharpening. My only advice would be to use a fine good quality oil for the final honing on a good quality, preferably natural oil stone.
Carpentry reference: Modern Practical joinery by G.Ellis
Model Practical Joinery by G Ellis , second edition 1925
Porch replacement in Southampton
Rot had set in at the base of this post, a common problem. The replacement portion was 800mm long a hardwood key was also inserted to prevent any slip on the joint.
I could have also used a stepped Scarf joint which would have had the same effect as the hardwood key. Because the overall height of the porch was 3.5meters I was concerned that there could still be some movement in the post -possibly buckling , so it was decided to add a handrail and spindles at the end of the porch. This prevents potential buckle in the post and also I think finishes the job off nicely.
Replacement Pergola
A replacement Pergola, the original was blown down after a winter storm. It creates a welcoming invitation to enter into a private secluded back garden in the centre of the city. The various shrubs and roses that embraced the old pergola were saved and will be woven into this replacement and no doubt come the summer will be a picture of colour. I am quite interested in this kind of work and look forward to enquiries for custom made structures.
Victorian bench
This much cherished Victorian bench has been part of the family for over a century, with photographs of grandfather sat on it as a young man. The rot in the feet of each leg being the result of many years standing on damp ground and ‘old age’. The solution was to sit the bench onto my work bench propped up and the legs cut back. Oak shoes were then glued on and Oak pegs introduced to make sure that the shoes hold fast for years to come.
Shed rebuild
The customer was hoping I could do something with their much loved and well used shed. The alternative to repair would have been replacement. A 20ft x8ft shed costs around £4000. Then there is the cost of installation to add. So after careful inspection of the floor and floor bearers , I decided that it could be salvaged.
A replacement frame with window was made and installed. It was then clad in shiplap and re- glazed. All timber used is tannalised and all the end grain treated with wood preservative. A belt and braces approach that results in a new lease of life for the shed and a gentler assault on the wallet!
Refurbishing a garden seat
This chair was of great sentimental value, the customers husband used to use it whilst convalescing, but sadly passed away.
So, ‘ whatever it takes’ was the message given to me. Initially I tried to salvage the old slats by pressure washing them and intended to soak them in wood preservative, unfortunately they fell apart so I ended up manufacturing replacements and fitting these with new fastenings.
The result is a simple garden seat given a new lease of life which will give years of service.
On an environmental note, doing this saved resources that would be used manufacturing a replacement, the shipping and transport, and potential landfill of the old one, the three Rs- Repair, Reuse, Recycle is a mantra that we should all adopt.
Wood hand crafted speakers
These speakers are made from Oak, Ash, Iroko and Cherry.